Wednesday, April 20, 2011

Navigating your way through your word document

You’ve probably used the double arrow buttons to go from page to page, but did you ever wonder what the circle was for?  If you hover your mouse over it, it will say “Select Browse Object”

If you click on it, you’ll see a number of pictures

Each of them gives you a different feature that comes in really handy at different times.

The first button, the arrow pointing right will give you a “Go to” dialog box that you can also get by hitting Ctrl G. 

The binoculars will open up the find dialog box (which is also the replace dialog box on the other tab).

The pencil will allow you to browse by edits.   So when you click on the double arrows, it will go from edit to edit.  Now if you don’t remember where you’ve edited, you might think the button is drunk or not working correctly.

The Browse by Headings is helpful if you’ve used styles.  This is especially great if you have a long document and have the headings to go from one to another.

Browse by Graphic.  This of course will take you from picture to picture.

Browse by Table, so if you have a number of tables in your document, you can go from one to another quickly and easily.

Browse by field.  No this is not a corn field or any other produce.  This is the different merge fields in your document.

The next two, browse by End Note and Footnote are two sides of the coin. 

The yellow guy is browse by comment.    If you’ve inserted comments, searching for them can drive you nuts, and this guy will help keep you sane.

The two pieces of paper with the arrow is for browsing for when you change paper direction.  You do know that your Word document can have pages going in different directions or even  different sizes, like having the envelope and the letter in one document.

The last one is the one we’re all familiar with, browsing by page. 

Now go out and give the other buttons a chance. 

Monday, April 11, 2011

My kingdom for a Tab stop…well maybe just my document for a tab stop

Tabs are very useful things especially since we are all using proportional type (there is space in the width of a w for five letter I’s). In the very old days, you could get away with using spaces instead of tabs. On a typewriter you could put in a tab, but they only justified on the left.  Word’s tabs can left justify, center, right justify, decimal tabs and even draw a vertical line down your text.

Word’s default is to set a tab every half inch.

If you know the measurement for your tab stops (I want one at .5, 2.25 and 7”) then you can easily use the tab setting in the paragraph menu.

Once you click on the tab button in the lower left, you’ll see


This is where you will type in the measurements for the tabs that you want.  Below is a sample of what each one of the five options gives you for settings:


The top of each column tells you what type of tab it is except for the bar tab. It’s the three vertical lines. With a bar tab, you just set it and anytime you type a line, it will insert a vertical bar in your data.

You also have the option of leaders (those dots between the text and page number in a table of contents).  Most times you will probably choose none, but having the other three choices is handy. To set these, click on the tab you want to change to one of the other types.  Left and none are the default choices. Also here’s where you can clear all the tabs. It only does it in the section that you’re working in.

For me, most times I don’t know what measurements I want, I just want to set a tab. To set a tab and be looking at your data, you need to make sure that your ruler is turned on. It should be located on the view menu. Here’s the s on the ruler for the previous sample:
Notice the L (left tab) the three short vertical lines are where my bars are. The upside down T is a center tab. This one will allow you to center text over a column or some other data instead of the center of the line. The backwards facing L is the right tab, where everything is justified on the right side. The last one is the decimal tab which is the upside down T but with a dot in the upper right corner. To change from one type of tab stop to another, on the far left side of the ruler, you will see the L for a left tab. Just keep clicking until you get the one you want.

There are two more icons on here, the upside down triangle and the rectangle.  The upside down triangle controls the first line of your paragraph. You were probably taught to tab to indent a paragraph; you’re showing your age!!!   If you are planning on writing a document with the first line indented, set this guy to how far you want the line indented, and all of the paragraphs that you type will be the same.  Now if you’ve done your document in block style (everything to the left), and now you want each first line of a paragraph indented, select all the paragraphs, and once you have the first line indent chosen on the far left, you can click where you want all the paragraphs indented. If you’re careful, you can grab the downward facing triangle on your ruler and drag it to where you want, but remember only the very tip of your mouse pointer is the active part.

The other icon is the rectangle, and it controls all the other lines in your paragraph. This is used when you want a hanging indent, for example when you want 1. Tab and text, and you want the 1 to be hanging to the left of the rest of the paragraph. This is set the same way as the first line indent.  To me this is very interesting, because if you were just using the icons on the ruler, you would want to grab the upward pointing triangle and drag it for the remaining lines indent.  The rectangle below it will move both the first line and the rest of the paragraph indent together as a pair.

One thing really nice about tabs, and using the ruler, is if you find out that your data is longer than the space you had set, you can select your text and then drag the icon to where you want it to be now. The text will automatically move as you’re dragging the icon around.

Sunday, April 3, 2011

Page Numbers


Page numbers can be the bane of many a person's Word document.

There are so many choices. Do you just want the page number? Do you want the Page of So Many Pages? Do you want the Roman numbers (iii) and then have it change to Arabic numbers? (3)

Word can do all of these. It's just figuring out how to get it to behave.

When you choose insert page numbers, Word will ask top or bottom, and then where do you want the number to be positioned. There are more choices the later the version of Office you have. Once you have made your choices, you'll find that Word has put your page number into a footer or header. Why is this a good thing? If you are going to be making edits to the body of the text, Word will automatically keep track of the where the page numbers should be, and make sure they are there.

Now you have page numbers, but you wanted Roman numbers. To change to Roman or if you wanted to add the word Chapter or some other prefix to the number (Section 45 – Page 3), you would do that with Page numbers formatting. Go back to where you choose page numbers, and you will see a number of choices

The number format is where you can choose what page number format you want to use.

Notice how you can include a chapter number. Notice that it asks what style your chapter starts with. One of the lessons coming up soon is styles. Styles are a set of formatting and items that Word needs to keep track of for things like table of contents.

The next option in Page Number formatting is whether to continue from previous section or start at. The main purpose that I have used this is when I want to switch from Roman to Arabic numbering. You would normally keep the page number continuing from the previous section.(Sections are important items when you want to change your paper layout; when you want to go from one column to multiple columns and back again; and any other items that Word absolutely needs to obey.

Sections can also get you in trouble. I was working on a document that had been touched by a number of volunteers. Somehow, they had the document going from page 5 to page 7.No page 6.The material wasn't missing anything; just the page number was missing. The culprit was Sections, and a "don't copy from previous section" in the footer. Once I killed that (a 10 second action), the problem was solved.
One thing that I've noticed on 2010, and don't remember in 2007, is that they now have a remove page numbers.

Give it a try and let me know if you have any questions or problems.
Lexi

Sunday, March 27, 2011

Darn Paste – Why doesn’t understand what I want to do???

You have some text in a different file, and you want to copy it to your new document, but when you paste it, it screws up.  Either the formatting is wacky, or other things go on.
I was working on my resume this morning, and I had a graphic line at the top by my name.  After listening to a class given by Dirk Spencer, author of Resume Psychology, where he stated that most of the job boards will treat anything in a text box or something similar as a graphic and don’t do it.
Well, I tried selecting the line, I tried copying and pasting the text before and after the line, and everything I pasted, that blasted line would come over into the new document.  Grumble, grumble grumble.
Starting in 2003, Word gave you choices when you pasted text into a document.  You would see a clipboard with a drop down arrow.  If you clicked the arrow you’d see these choices

·         Keep Source Formatting:  Keep it how it looked in the old document, including graphics and spacing around the text
·         Match Destination Formatting:  Use my current styles and choices
·         Keep Text Only:  Get rid of anything that isn’t just the text.

In version 2010, it looks slightly different. 
Now the choices are the three icons, Keep Source Formatting, Merge Formatting (same as the destination formatting from the previous versions) and Text only.
By choosing text only, I was able to get rid of that blasted line. 
Paste Special
Paste special is really good when you need to put part of an Excel spreadsheet into a Word document.
You could do just a regular paste, but if you need to update the information

Notice how many more options you’ve gained.
Your first two haven’t changed, as they are:
·         Keep Source Formatting
·         Merge formatting

And the table from Excel is converted to a Word table in both cases, and is editable.  Any changes you make to the data in the Word document won’t be sent back to Excel and vice versa.
·         Link and Keep Source Formatting
·         Link and Keep Destination formatting
This option establishes a link between the two files, so if this was a monthly report, you could change the numbers in Excel, and they would show up changed in the Word document.
The picture icon would insert the Excel data in as a picture, so no one would be able to edit the data.
The last one is the text only.  Word inserts the data without the table format, and you can edit the data, and there’s no formatting.
In earlier versions of Paste Special, it would give you text, link or embed the text.  Text and linked you know, but Embed is new.  Embed was really good when you need to put a copy of the Excel file into the Word document.  It was good when you were going to separate the Word and Excel files. 
One word of warning on linked files.  The receiving program need to always know where the source document is (in our case Word is the receiver and Excel is the source).   If you move the source, then you will have to tell the receiver where it went. 
Good luck and let me know if you have any questions.

Lexi

 Now we get into some changes:

Thursday, March 24, 2011

One Note

Now where is that post it note???
If you haven’t played with OneNote, you’ve been making life harder for yourself.
What is one note? It’s the electronic equivalent of a physical paper notebook.  And keep that image in mind as you read this.  You can create multiple notebooks, so you can have one for personal stuff, one for receipts, one for recipes, one for the financial documents with the supporting documents (no matter what program they were done in) and one for purchase orders.

At my last company we used one note for the department for all those “how to” documents.  Especially the ones that we would do about once every six months.  You can include screen shots, pictures, printing, copy paste in your notebook.  My former boss is very happy that we did this, because he’s having to do my job.
Inside of each notebook, you can have section tabs to keep it in order.  So you could do one for each quarter, month, vendor, and program.  As you can see on the graphic above, the left side contains the notebooks (Work Notebook, Personal Notebook) and under each notebook listing, you’ll see the different tabs.  Notice that the tabs are also listed at the top.  Because I shrunk the width, you don’t see all the top tabs.
On the right are all of the pages in the section.  The titles that appear on the right are generated from the bubble at the top (notice that Store personal information in this section in the bubble is the same as the white tab on the right).
To create a notebook, go to file, new notebook.   You can choose to keep it on your computer, a network drive or with 2010, on the web.  You may want to save it on the network, as One Note has the ability to synchronize the notebooks between users, so the latest information is almost immediately available to the other people who have that notebook open.
So now that I have you excited about creating One Note notebooks, how do you get your material in there?  That’s easy!!!  You can:
·         Copy and paste
·         Send to One Note – You’ll find this in Outlook 2007 and 2010.  When you open an email, you’ll see a send to One Note
·         You have a print driver called “Send to OneNote, which can be used with any application that you can print.
More later!!!

Tuesday, March 22, 2011

Darn! Just found out that Aebleskiever should be bolded, italics and red….and it’s all throughout my document.

And I don’t want to deal with styles….so how can I do this quickly and easily?
The answer is Format Painter. 
What’s that?
 It’s the little paint brush that you see on the formatting toolbar or the Home Ribbon.

Okay, I’ve found it….now what?
Format the text the way you want it to look.
Done.  Next?
Highlight the text that is formatted the way you want.  If you are going to just format one thing the same way, then click on Format Painter one time.   If you’re going to use it more than once, double click on Format Painter.  If you double click, it will stay on until you click it off, or do something else in Word.
By the way, that’s how I formatted this blog entry.  And when you’re so excited about this, then go take a peek in the other Office programs and notice that Format Painter is waiting for you.
So what’s an Aebleskeiver?
It’s a Danish pancake.

Sunday, March 20, 2011

Okay, I have a bunch of data, but how do I filter it??

To be able to filter data in Excel, you must have a data table. 

What’s a data table?  A data table is one where the first row is labels and each row below the label row contains data.  Now, not every cell has to contain data, but every row has to contain data.
If you have a blank row in your data table, Excel assumes that it’s the end of your data table.
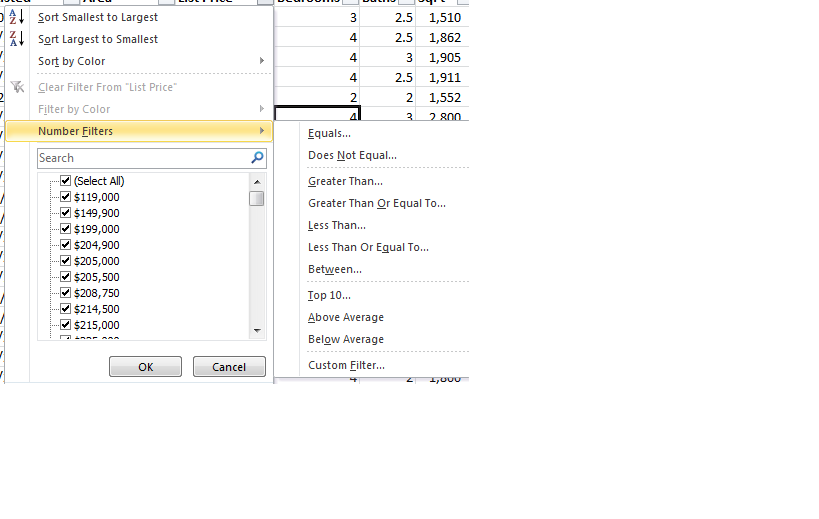
To filter, choose filter  (autofilter).  When you do, you’ll see triangles to the right of each column’s label.  If they don’t appear, then you may be clicked outside of the data  table.  Click on any cell in the data table and then choose filter (autofilter).

The next step is to click on the triangle on the column you want to filter on.  You can do more than one column.
Depending on the data, Excel may list the different column’s data.    It will give you all the data in the column for you to choose what you want to see.

If the data is a date (3/14/11), then Excel will give you the data by year and then month.  You can drill down and choose a particular set of days if you wish.  Click the pluses in front of the months to drill down.
This example is Excel 2010, but similar choices are in older versions, top/bottom quantity and either percent or items.  There are choices as you can see.
Now that you’ve filtered it, and saved it with the filter; you now come back and open the file and don’t remember what you filtered on.  How do you tell?  If you have an older version of Excel, the triangles will be blue instead of black.  In the newer versions (2007 & 2010) they’ve changed from a blue triangle to a funnel.  It makes it quicker to spot with the funnel than the blue triangle. 
To unfilter the data, click on the triangle (funnel) and choose select all.  It will unfilter all the data in that column.

Changing the subject a little bit, do you when you want to sort data on a certain column, choose the column and then cuss because it just sorted that column, and is no longer attached to the correct rows?  The problem is when you choose a column and tell Excel to sort, that you want it to only sort that column.  What you want to do, is click in a cell in that column and then tell Excel to sort.  It will sort on the column BUT keep the rows together with the data you sorted on.


Monday, March 7, 2011

Now where is that post it note???

If you haven’t played with OneNote, you’ve been making life harder for yourself.
What is One Note? It’s the electronic equivalent of a physical paper notebook. And keep that image in mind as you read this. You can create multiple notebooks, so you can have one for personal stuff, one for receipts, one for recipes, one for the financial documents with the supporting documents (no matter what program they were done in) and one for purchase orders.
At my last company we used One Note for the department for “how to” documents; especially the ones that we would do about once every six months. You can include screen shots, pictures, printing, copy paste in your notebooks.
Inside of each notebook, you can have section tabs to keep it in order. So you could do one for each quarter, month, vendor, and program. As you can see on the graphic above, the left side contains the notebooks (Work Notebook, Personal Notebook) and under each notebook listing, you’ll see the different tabs. Notice that the tabs are also listed at the top. Because I shrunk the width, you don’t see all the top tabs.
On the right are all of the pages in the section. The titles that appear on the right are generated from the bubble at the top of each page (notice that Store personal information in this section in the bubble is the same as the white tab on the right).
To create a notebook, go to file, new notebook.  You can choose to keep it on your computer, a network drive or with 2010, on the web. You may want to save it on the network, as One Note has the ability to synchronize the notebooks between users, so the latest information is almost immediately available to the other people who have that notebook open.
So now that I have you excited about creating One Note notebooks, how do you get your material in there?  That’s easy!!!  You can:
·         Copy and paste
·         Send to One Note button – You’ll find this in Outlook 2007 and 2010. When you open an email, you’ll see a send to One Note.  It’s
·         You have a print driver called “Send to OneNote, which can be used with any application that you can print.
More later!!!

Tuesday, March 1, 2011

Select…How do you select????

One thing that I see people do, is not take advantage of all the different ways.  So here we go from small selection to the entire document:
Okay, first open Word and a document so you can give this stuff a try…if you don’t try it, you won’t remember.
Word:  Double click anywhere in the word
Line of text:  Here’s the magic.  Notice that your mouse pointer points to the left.  Move to the left margin, and notice it will flip to the right….Magic right?  Now click and the line is chosen.  If you hold the mouse button down, it will continue to select.
Sentence:  Ctrl and then click anywhere in the sentence
Paragraph:  Triple click anywhere inside the paragraph or get the magic right pointing mouse pointer and double click.
Large block of text:  One thing that I see people do when they have more than a screen’s worth of text, is they will click, and drag with their mouse, and then the screen zooms up, and then they will go back towards the top because it selected too much.  Talk about driving yourself nuts….okay here’s the secret.  Click at one end of your selection (doesn’t matter which end). Release the mouse!!!!  Now scroll to the other end, hold down the shift key and now click….you should have everything in between selected.
Entire document:  Get your magic right facing mouse pointer and triple click…or quicker, Ctrl A.
Vertical Selection:  Now here’s the one that most people don’t know, If you have a tabbed table, you can select just one column or a vertical selection.  Click here you want it to start.  Release, hold down your Alt key and then click and drag.  You know it’s working correctly when it doesn’t try to grab the entire line when you drag down.

Friday, February 25, 2011

Are you using the right program?

I was chatting with my friend, Greg, who started out as a student in a class.  He reminded me of a thing that I used to do.  Some things seem harder than they actually are.  So when I was about to teach them one of those items, I'd put the back of my hand to my forehead, and sigh, "so much work, so much work, it's going to take hours to do this".  I would then do it in about 30 seconds and have time to do what I wanted to get done.

Looking at my last post, I talked about the table column format and changing it to regular columns. As you can see from this picture that the table has multiple columns.


You could spend hours separating this into one long column, or you could do it in a few minutes.  How??

Copy the entire table to Excel.  The table format in word will copy directly over to Excel.  Each cell of the table will go into a separate cell in Excel.

I then moved the 2nd column's data to the bottom of column 1st.  Repeat as necessary.

Once you have the data all in one column and sorted the way you want, copy and paste it back into Word....but there's a trick there too.  If you just paste, you'll have it in a grid.  The secret is to paste it into Word as text only. 

Next step is to treat it like any other text you want in columns.  Select the text and choose columns and how many you want.  Voila!  You're done, and it was almost as fast as putting your hand to your head.

Columns, Columns Columns -- Which way do I go?

I'm working on a project, and I've inherited the file.  It's been used by many different people with different skill levels.

I have three tables that contain columns of data.


One is done "correctly" and two aren't.  See my next entry on the tricks to get this fixed easily. 

There are multiple ways of creating columnar tables: 

Typewriter style.  In this method, a tab stop is set at each point where you want a column to start and type "Communications <tab>Horticulture<tab>Records Management <return>
Community Affairs <tab>Human Resources<tab>recruiting<return>" and so forth.

The problem with this if someone wants to insert or delete an entry, getting everything back in alpha order in each column is nearly impossible.  Many man hours would be used to get it correct if it's a lengthy list.

Table Style.  In this method, you'd use the Word Table option.  You would insert as many columns as you would need to show your data.  If I decided to change the number of columns or changed the entries, I would have the same problems as you would with typewriter version.

I like this method instead of doing a tabbed table, but I don't like it for columns of data


You can turn off the grid, so no one seeing a printed copy knows that you used a table, but you have the same problem with column data as you do with the tabbed table.  Moving entries from column to column would be very tough.   If you've inherited a table like this, see the next entry on how to quickly fix this to a column table

Column tables.  Column tables are perfect for this application.   When you delete or add entries, Word automatically moves the entries from one column to the next as needed.  Editing is very quick and easy. 

To do a column table, you will need to use section breaks.  Section breaks can be your friend or your enemy.  Section breaks can be used to do page breaks, make sure that the next page of a chapter starts on the odd page.   Section breaks are also used when you need to make sure that Word will follow your command.   If our document was all multiple columns, then you wouldn't need section breaks.  But most of us go back and forth between one and multiple columns. 

A basic tenent in Word's philosophy (and explains a lot of why things are setup as they are) is they expect you to just type in all your text, no formatting.   When you've finished typing all your text in, then Word expects you to go back through and format it.  Select then do is the one thing to remember with Word.  Those of you who are old enough to remember Word Star and Word Perfect, it is a mind shift to understand Word.

Since Word's philosophy is get the text in, and then select and do, type all your data one after another, such as
Calculate
Catalogue
Chaired
Clarify
Classify
Coach
Collect

Once you've gotten your list in, then select the entire list, and then choose columns.  The basic column choices are 3 even columns.  If you need to change them, then choose more columns. 

By doing the select and do, Word will automatically insert the continuous section breaks before and after.  Now you can delete words, and Word will move the data up.  If you add, it with push the entries below down.

Give it a try.  Remember, playing when it's not crunch time, will help when you do have to do it in a crunch.

Next entry:   How to get the data from a table format into a columnar one. 

Lexi

Thursday, February 24, 2011

If you're struggling, you're doing it wrong

One thing that I have found in my years of teaching MS Office is, if you are struggling to get it to do what you want, you're doing it wrong. 

Nothing I have ever had to do, was I the first person to do it, or that it hadn't been thought about. 

The purpose of this blog is to help with the thought and concepts behind why you do the tasks, makes it easier to understand how to do the task.

Please let me know if there things you don't understand or suggestions!

Lexi